You have a beautiful print, and it ends up with an ugly striped, ragged top surface. You waited for hours, and the result is far from what you wanted due to the last thing you printed. I feel the pain and frustration like many other 3D print enthousiasts and professionals do.
Luckily for us there are a whole number of settings in most slicer programs that can improve the visual appearance of the top surface.
I’ll focus on one slicer alone (Ultimaker Cura) If you use another slicer, it is likely you can find similar settings in that software.
What is special about the top layer(s).

First, the top layer may be one of the most visible aspects of your 3d print. If you have a messy top surface the whole print looks off.
Luckily for us the slicer programs have special settings for the top layers. You can see the Cura settings here. These settings do only show up if you enter a number greater than zero in the Top Surface Skin Layers field.
Setting to choose from.
So now we have some special settings to go over:
- Top Surface Skin Layers.
This is the number of top layers to be printed. It affects the visual appeal of the top where 2 is usually the most because the affect of top surface layers is much less when using more. - Top Surface Skin Line Width.
The skin line width in mm. If your normal line width is 0.4 mm you may want to consider reducing this to 0.3 mm. This will of course increase your print time. - Top Surface Skin Pattern.
First this: the top surface is mostly cosmetic where the other top layers do the real work. Still your choice has some influence on the strength of your print. Especially when it only has a few layers.
In the pictures you can see the different patterns Cura has available. All are printed with 1 skin layer, 0.3mm line width, the mentioned pattern, monotonic when available and no preference for the line direction.
Lines gives the strongest bond to the walls, but the zig-zag option has a better visual appearance. Finally, the concentric choice certainly has a geometric appeal, and some sources suggest that it the best choice for liquid tight surfaces. This is however strongly linked to the surface geometry. All FDM1 prints have to be looked at with a bit of caution as far as food safety goes due to the irregular surfaces a potential pockets that can be very difficult to clean.

More settings.
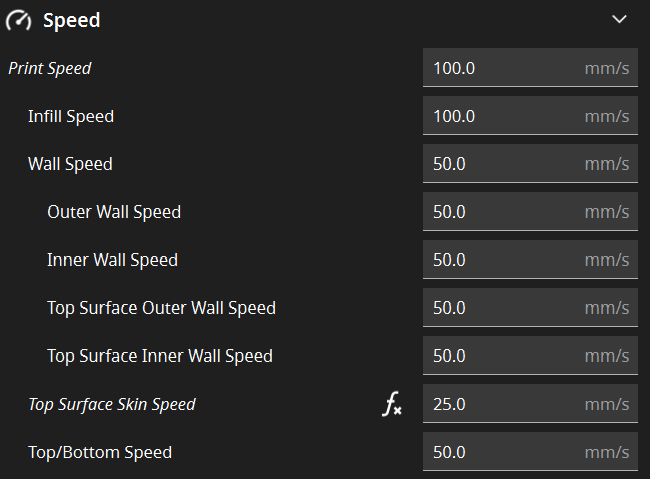
One of the most important settings is the speed setting. This setting is only visible if you have enabled the Top Surface Skin Layers field. In the Speed menu are three different settings for the top surface.

- Top Surface Outer Wall Speed. A setting the I personally leave at the same speed as the normal outer wall speed.
- Top surface Inner Wall Speed. Same here. No change from the normal inner wall speed.
- Top Surface Skin Speed. Now this is where it gets interesting. This is a personal taste thing. You can, as I did in the example, choose a slower speed than your reference, Top/Bottom Speed. Now you get nice painted lines. But, when you choose a higher speed, we get more defined lines, especially on larger surfaces. Choices….
Some housekeeping trick: Ironing!
Ironing is the technique of sliding the hot nozzle over the top surface to smoothen it. A bit of filament is used (about 10-15% of normal extrusion) to fill any imperfections and increase the heat transfer between the nozzle and the existing top layer.
Ironing is typically done at a low speed (20 mm/s) and the horizontal spacing between ironing strokes is very small (0.1 – 0.2 mm). Cura has some more settings, but Ironing and the detailed way of tuning is a story by itself that will be told another day.
Please let me know if this article helps you or any comments or questions.
Happy printing,
Robert
- FDM is a trademark of Stratasys and stands for Fused Deposition Modeling ↩︎

Leave a Reply